There are other solutions out there Mail-in-a-Box, mailcow, iRedMail, Modoboa and Kopano. However I have been using Zimbra Open Source Edition for a few years now and enjoy the web interface for administration of the system, it makes it easy to add new accounts and alias.
The only thing that I found lacking was the support of ActiveSync, Zimbra does support it but you have to buy their Network Edition and it charges per user which is expensive for home use.
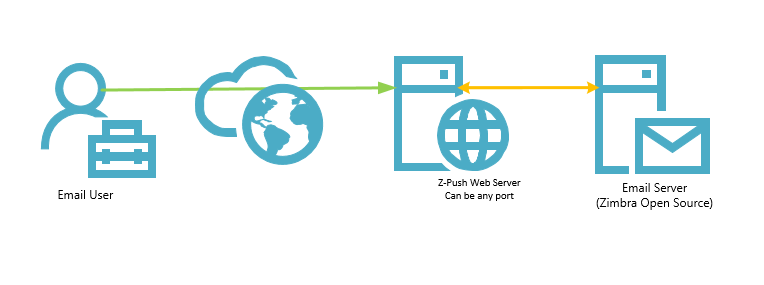
I kept looking for a solution, I stumbled upon Sogo which provides ActiveSync however you would need to setup a Dovecot proxy, I never used Dovecot so I skipped that option. Then I ran into Z-Push, in which they typically use Dovecot or Cyrus IMAP, however I wanted to keep using Zimbra Open Source as my email server, so I found an integration between Zimbra and Z-Push.
What you will need, two Ubuntu 16.04 VMs or Containers
- Zimbra Open Source Edition (This assumes you already have Zimbra running)
- Z-Push Server
Step 1: Create the files for Z-Push
Create files for Z-Push to write to
mkdir /var/log/z-push

touch /var/log/z-push/z-push.log

chown www-data:www-data -R  /var/log/z-push
Setup logrotate
nano /etc/logrotate.d/z-push

/var/log/z-push/*.log {
daily
missingok
rotate 14
compress
delaycompress
notifempty
}
Step 2: Add Z-Push to system
Add repository to system, update repository, install nginx, php and ensure permissions are set.
sudo nano /etc/apt/sources.list
- sudo nano /etc/apt/sources.list
- wget -qO – http://repo.z-hub.io/z-push:/final/Ubuntu_16.04/Release.key | sudo apt-key add –
- sudo apt-get update
- sudo apt-get install nginx php-7.0 php-7.0-curl
- sudo apt-get install zpush-common z-push-config-nginx z-push-autodiscover z-push-ipc-sharedmemory
- Ensure z-push has web server permissions
chown -R www-data:www-data /usr/share/z-push/
Step 3: Download Z-Push Zimbra Backend
Download Zimbra Backend and install script
- https://sourceforge.net/projects/zimbrabackend/files/latest/download?source=files
- https://sourceforge.net/projects/zimbrabackend/files/Release68/zpzb-install.sh/download
Step 4: Ensure Zimbra DosFilter is updated
Add IP address to whitelist for DosFilter
zmprov mcf zimbraHttpThrottleSafeIPs 10.1.2.3/32
Verify the IP address exists in whitelist
zmprov gs zimbra.example.com zimbraHttpThrottleSafeIPs
zimbraHttpThrottleSafeIPs: 10.1.2.3/32
Step 5: Copy Zimbra Backend files
Copy Zimbra Backend to correct folder and untar
 cp zimbra68.tgz /usr/share/z-push/backend/
./zpzb-install.sh 68
Edit /usr/share/z-push/backend/zimbra/config.php Uncomment the url that fits your needs and update define('ZIMBRA_URL', ' https://zimbra.example.com');
Edit /etc/z-push/z-push.conf.php date_default_timezone_set("America/New_York");
define('PROVISIONING', false);
define('BACKEND_PROVIDER', 'BackendZimbra');
define('ZIMBRA_DISABLE_URL_OVERRIDE', true);
Step 6: Configure webserver
Web Server
- Enable SSL
- Add Certificate and Private Key
- Uncomment any PHP-FPM comments
- Restart nginx restart
Sample nginx configuration file
server {
server_name zpush.vlarussa.com; # Put your server name
# Uncomment the following lines to enable SSL support if not configured yet
listen 443 ssl;
listen [::]:443 ssl;
listen 1000 ssl;
listen [::]:1000 ssl;
ssl on;
ssl_certificate      /etc/ssl/zpush.vlarussa.com.crt;
ssl_certificate_key  /etc/ssl/private/zpush.vlarussa.com.key;

# If you're using PHP-FPM uncomment the following lines.
include         fastcgi_params;
fastcgi_index   index.php;
fastcgi_param   SCRIPT_FILENAME $document_root$fastcgi_script_name;
fastcgi_param   REQUEST_URI $1;
fastcgi_param   PHP_FLAG "magic_quotes_gpc=off \n register_globals=off \n magic_quotes_runtime=off \n short_open_tag=on";
fastcgi_param   PHP_VALUE "post_max_size=20M \n upload_max_filesize=20M \n max_execution_time=3660";
fastcgi_param   HTTP_PROXY ""; # Mitigate https://httpoxy.org/ vulnerabilities
fastcgi_read_timeout 3660; # Z-Push Ping might run 3600s, but to be safe

location ~* /Microsoft-Server-ActiveSync {
    alias       /usr/share/z-push/index.php;

    access_log  /var/log/nginx/z-push-access.log;
    error_log   /var/log/nginx/z-push-error.log;

    # Attachments ca 15MB max (since binary data needs to be base64 encoded in mine, which results in in about 33% overhead)
    client_max_body_size 20m;
    client_body_buffer_size 128k;

    # Select one of the fastcgi_pass values or adapt to your configuration
    #fastcgi_pass    unix:/var/run/php5-fpm.sock; # for PHP 5.X Debian/Ubuntu
    fastcgi_pass    unix:/var/run/php/php7.0-fpm.sock; # for PHP 7.X Debian/Ubuntu
    #fastcgi_pass    unix:/var/run/php-fpm/php-fpm.sock; # usually RedHat and its derivatives
    #fastcgi_pass    127.0.0.1:9000; # default php-fpm config
}
}
Step 7: Increase PHP-FPM Limits
By default the php-fpm limits are too low (which will cause email fail to deliver or connect) and need to be increased.
nano /etc/php/7.0/fpm/pool.d/www.conf
pm.max_children = 50
pm.start_servers = 15
pm.min_spare_servers = 8
pm.max_spare_servers = 22
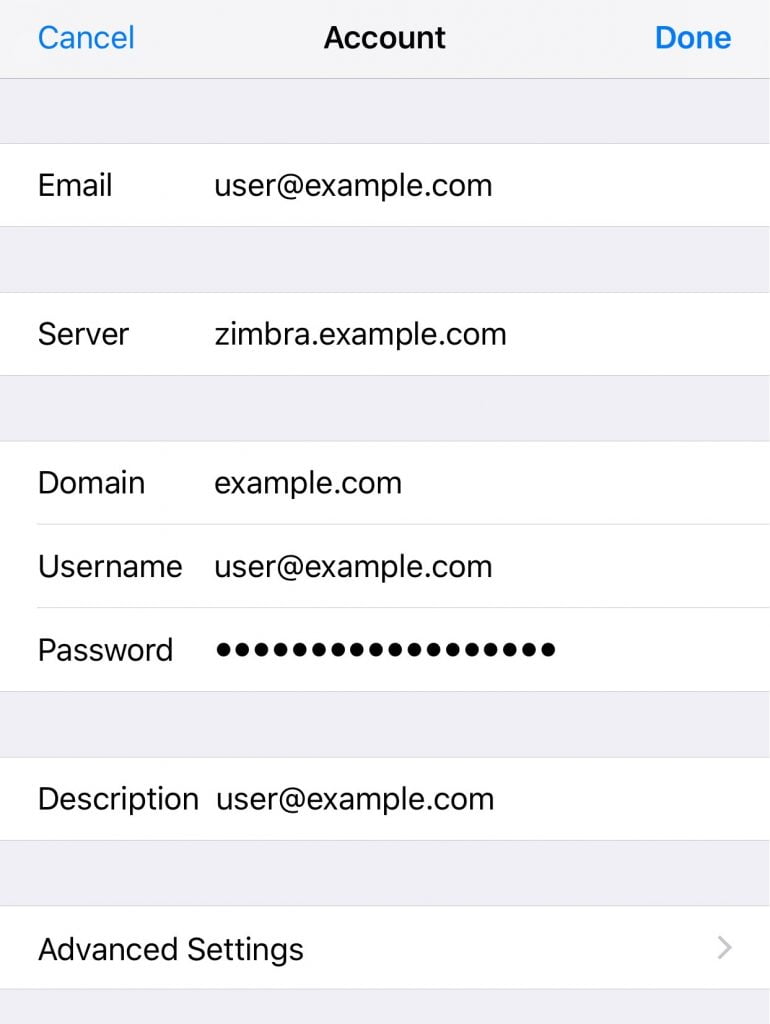
sudo service php7.0-fpm restartMobile Device Setup
Setup on IOS 11, this is you do not have Autodiscover configured if you would like to simplify adding email accounts see my post on configuring Autodiscover here: Email server Autoconfiguration with Zimbra and Z-Push
Troubleshooting
- Verify you get prompted for username/password when you go to https://zimbra.example.com/Microsoft-Server-ActiveSync
- Check nginx logs
/var/log/nginx/z-push-access.log
- Check Z-Push Logs
/var/log/z-push/z-push.log
Troubleshooting – Zimbra, ensure you have these set
zmprov md zimbra.example.com zimbraPublicServicePort 443
zmprov md zimbra.example.com zimbraPublicServiceProtocol https
zmprov md example.com zimbraPublicServiceHostname zimbra.example.com
zmprov mcf zimbraPublicServiceHostname zimbra.example.com
Restart Zimbra and Web Server
zmcontrol restart

service nginx restart
Optional, If your running your Certificate Authority you will have to install the root CA on the server
- Add custom CA-Cert here
- /usr/local/share/ca-certificates/Your-Custom-CA.crt
- Update CA Certificates
- sudo dpkg-reconfigure ca-certificates


